
GigLights – Copyright © 2025 by Puckett Works, LLC
All Rights Reserved
Introduction
GigLights turns your PC/Laptop into an Automatic Lightshow Machine. Using your existing DMX lights, you will have an automatic show without the need to touch your laptop all night. It’s like having a lighting person there controlling your lights who doesn’t get a cut of your hard earned pay.
GigLights listens intently to your music and syncs to the beat LIVE. No tracks needed. GigLights also analyzes your live music and determines the energy level of what you are playing in real time. It picks programs depending on what it hears you playing. It;s almost like magic.
There are a ton of features including a program wizard to get you started. You can create and edit your own scenes and programs but the wizard will create a full list just to get you started. You can delete or edit the ones you don’t want. You can even create your own. I will show you how a bit later on.
No other lighting software out there as of this moment in time is written just for the weekend gigging musician but that’s exactly what GigLights was created for. Those musicians who play on the weekends, making a little bit of pay for your efforts but not enough to want to pay some to run lights (unless you want to take home basically nothing). Most can’t even afford to pay someone to run sound. I know about these situations because I’m in 2 bands myself. We set and forget our own sound when playing bars and clubs which works fine for those places. I was running the lights and playing keys at the same time. Not fun. That’s why I decided to create GigLights. I knew how to code so it was a natural thing to do and I knew the pain points most gigging musicians face. I designed it to be hands free.
One of the nice benefits of running GigLights for your lighting is, it is up to you what GigLights does. You control what you want it to do as far as what lights to show and what the scenes look like. GigLights uses your scene creations and runs them depending on the energy of your music and tempo. Your show will be like no other band's show because it is your creation. GigLights automates your show so you don’t have to touch it all night.
Quick Overview on How GigLights Operates
The GigLights System starts off with having to know what your fixtures are. Once you tell it, they need to be placed in the DMX map. Once they are in the map, GigLights is mainly configured for your system. It will need the DMX Adapter to talk to your lights and the Audio/Microphone Adapter (or other input) to hear your music.
GigLights main base unit is a scene. Everything revolves around scenes. A scene is a group of fixtures and each fixture has channels set to certain values. Like one light may be lit up blue, one may be red, etc.. All these fixtures make up the scene.
GigLights uses “Programs” which are groups of scenes that are played in succession (like a chase). This creates cool patterns and lighting effects. These Programs are used by the Auto Program engine.
Music comes in through the Microphone or other audio input. This music as it comes in is analyzed in realtime to extract the beat and calculate the energy level of multiple areas of sound. Using the beat and the energy analysis, it selects auto programs from different intensities depending on what is being analyzed. Break, Calm, Normal, Intense and Big Ending are the intensity categories. The Audio analysis engine calculates all of this and selects the appropriate program for what is happening at that moment.
If it hears that the music has stopped. It will call up a break scene that is a static scene that can be dark, dim or whatever you want between songs. If the audio engine senses a lot of high frequency energy, it may fire a special scene called sizzle that is set up like a quick strobe for highlights. It will also try and sense a big ending when there is a lot of energy in a lot of areas and fire off one of the big ending programs. There is also a vocal light controller that will light up vocal spot lights when vocal frequencies are sensed.
All these systems work together to create a light show that is hands off and constantly changing, all synced live to your music you are playing at the moment in time. No tracks needed. And you might think it takes a lot of power to do all this but it barely uses any computer processor power at all. If it sounds complicated, be assured, it’s not. Once you use the GigLights, you will see how easy it is to use once you are accustomed to the controls and all the things you can do with it.
Like I said, it’s basically… Fixtures → Scenes → Programs. Fixtures are your lights. Scenes light up the lights and set the colors. Programs run a group of scenes in succession for lighting effects. That part is not that much different from other lighting software. The magic comes in on how GigLights calls and runs those programs unlike any other lighting software.
Lets’ Hit The Ground Running
I know you are anxious to start so let's at least get it set up and I will go into the details of how everything works in a bit. Setup is fairly simple but you need to know what GigLights needs as far as hardware.
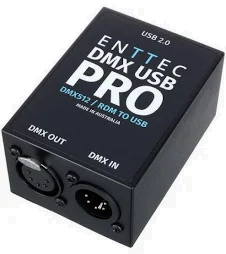
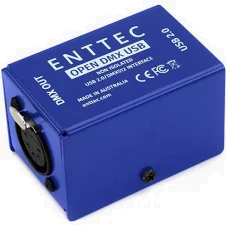
First, you will need a USB DMX controller. These can be bought from Amazon or other places for under $20 in most cases. I usually keep a couple around just in case although I really have never had one go bad. I designed GigLights to also use ENTEC DMX PRO controllers and also use Art-Net or sACN if you have that.
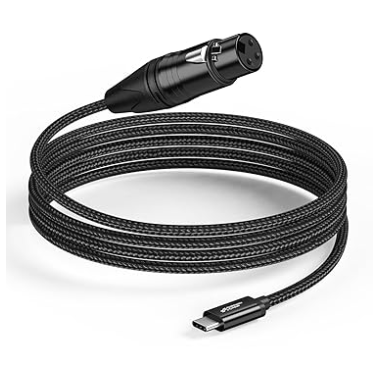
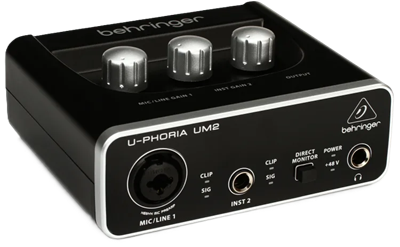
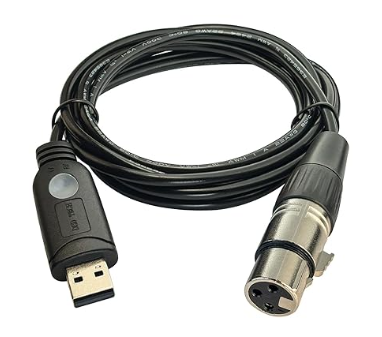
Next you will need some way to let the computer hear your music. I use a USB Microphone adapter that allows you to hook up a microphone to your USB port. It becomes the audio input to your PC. You can also use an AUX mix from your sound mixer into this cable setup with a drum heavy mix with excellent results. As a last resort, you can use your built-in laptop microphones but that is less than ideal but it does work but not great.
Once you have those two devices, you are ready to roll with setup. There is a preview mode you can use in GigLights that lets you setup things without the DMX adapter but you will definitely need one if you want to control your physical DMX lights.
When you plug in the USB microphone adapter, it will show up as a sound device in your computers’ sound settings.
The USB DMX adapter will not show up as anything until you install and run GigLights. At least mine doesn’t show up as anything anywhere but gigLights will find it if it is plugged in.
Setting It Up
Now it’s time to install GigLights. At this time of writing I am going in two directions with how GigLights is installed. One is from the Microsoft Store. The second will be downloaded from another source. I will update this document to reflect the final installation source.
If from the Microsoft store, Microsoft will install it for you. Just search for GigLights and tell it to install it.
If from somewhere else, click the file you received or downloaded and install GigLights.
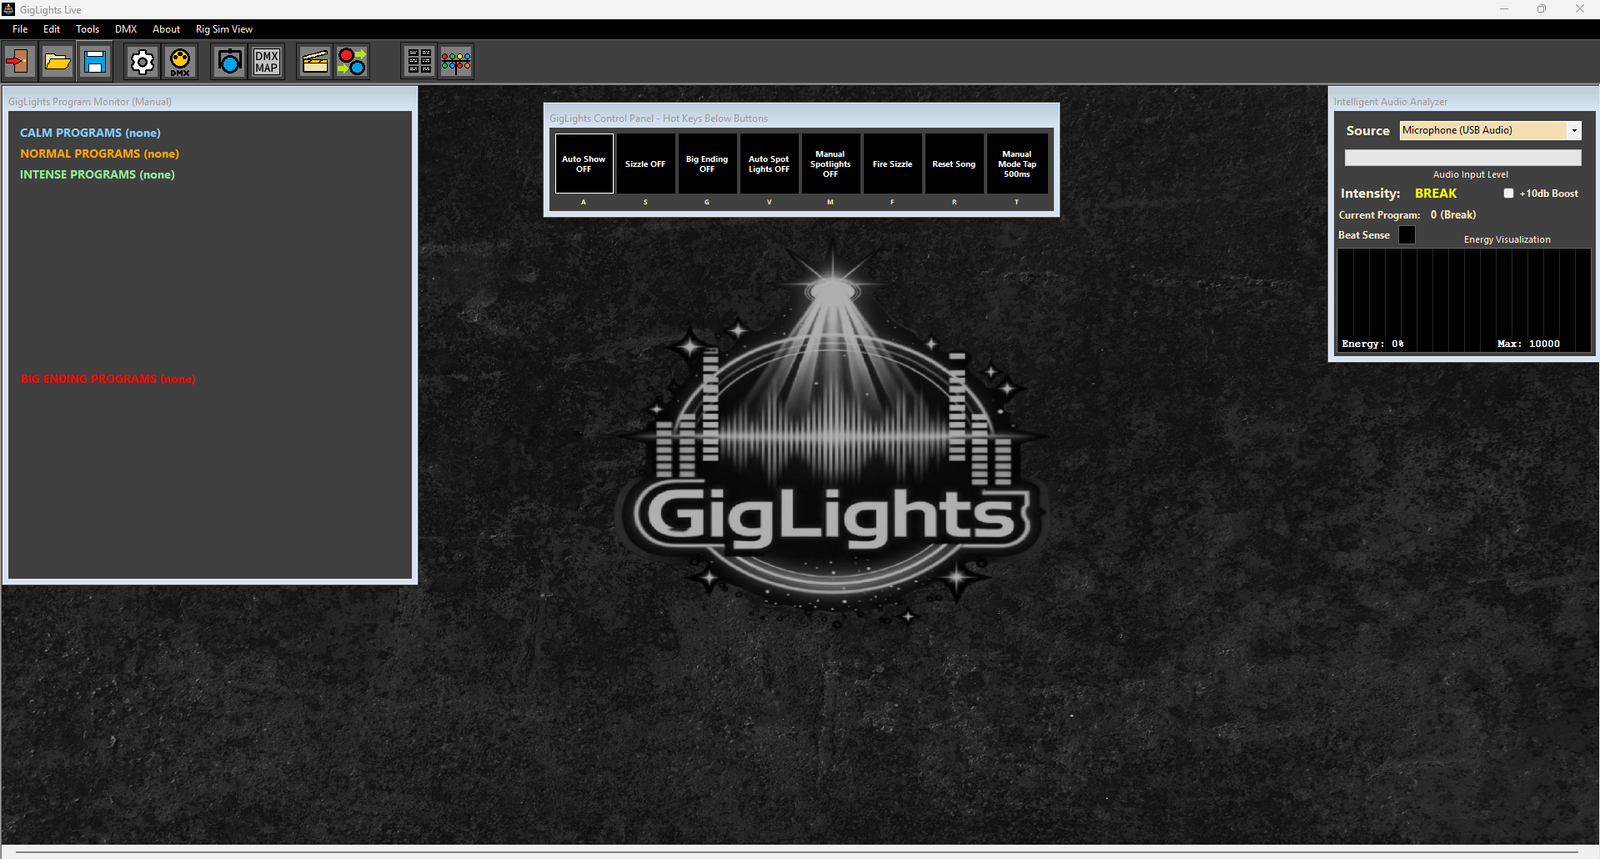
Once installed, start it up. It will look a bit weird at first since there is no config file yet and also no programs created. We can’t have premade programs yet since GigLights needs to know what lights you have and where they sit in the DMX map but we will get to that now.
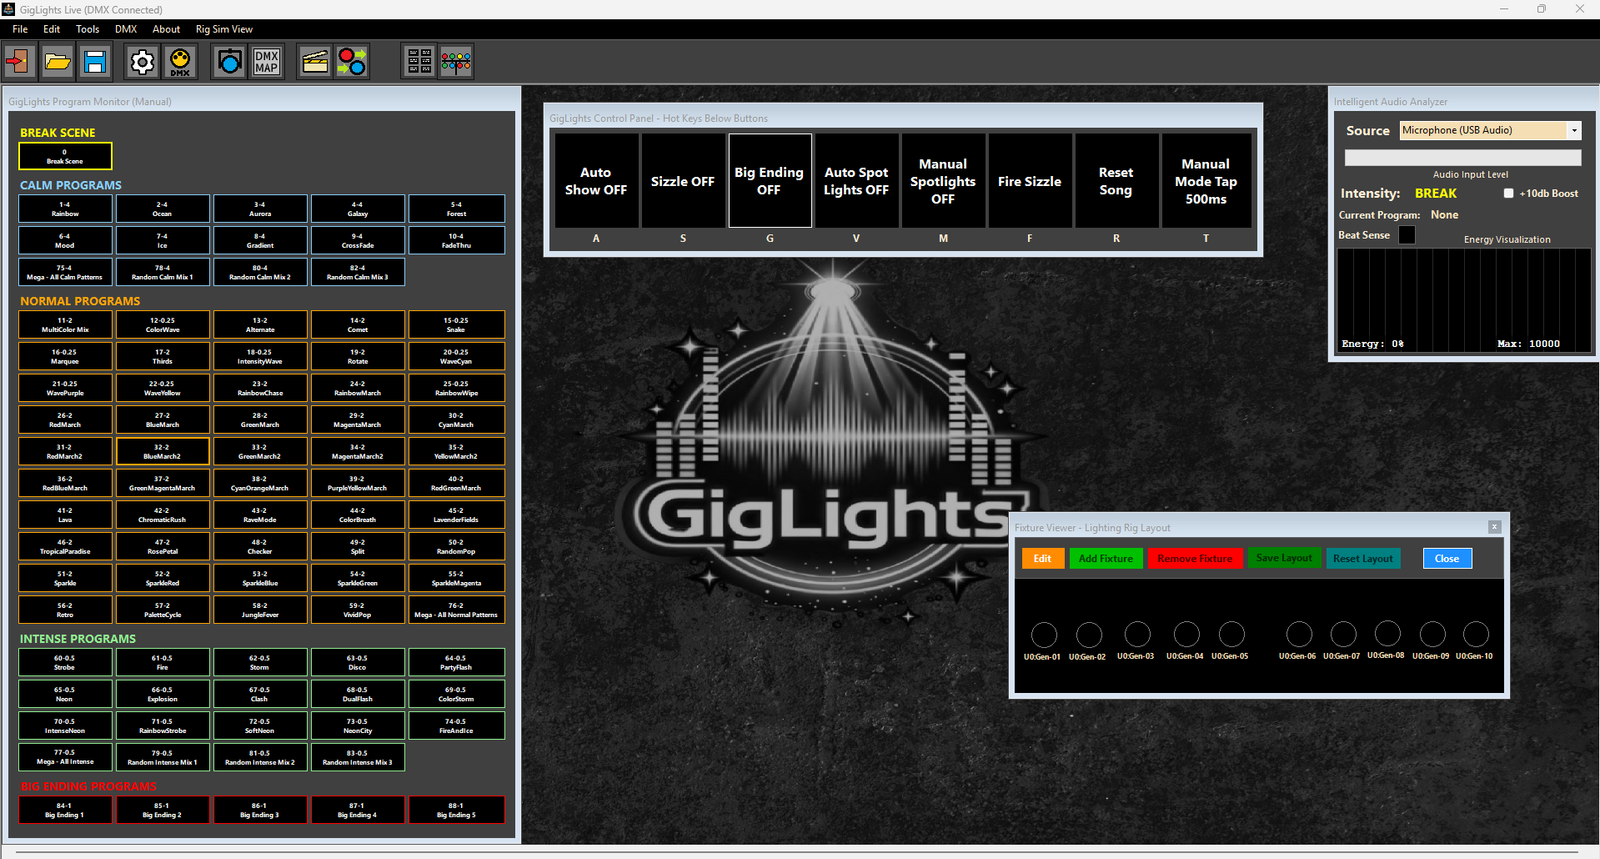
You may need to drag the windows into the positions like the image below since all PC screens are different sized and GigLights just starts up with everything on the left side until you drag it to match the screen below. I created it this way so you don’t lose a window off the screen on the first run. The positions you move the windows to will be remembered for the next time you startup GigLights.
Coming up, we are going to set up your DMX connection if you installed your DMX adapter…
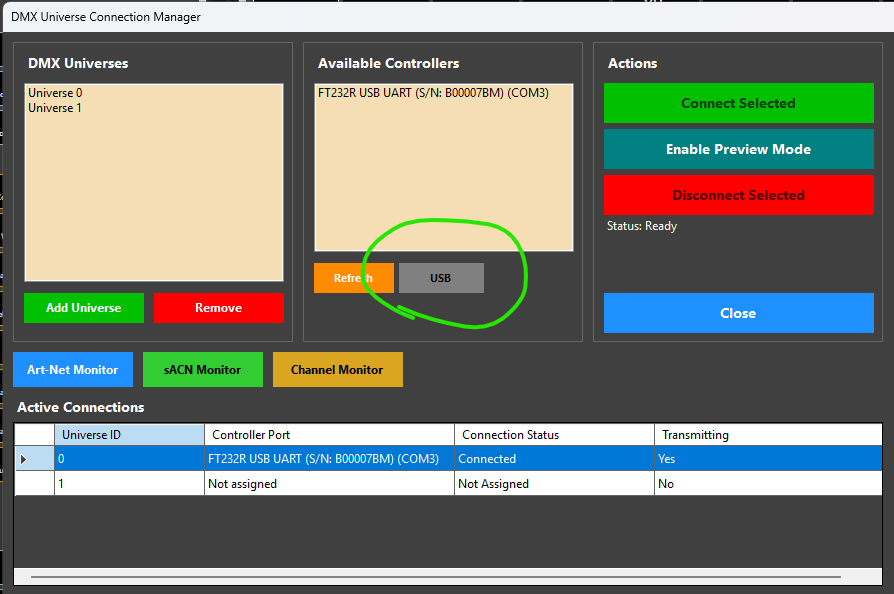
Connecting To Your DMX Adapter

With GigLights NOT running, make sure you have your USB DMX Adapter plugged into a USB port then bring up GigLights. Go to the Connection Window by clicking its icon on the toolbar that looks like the icon above.
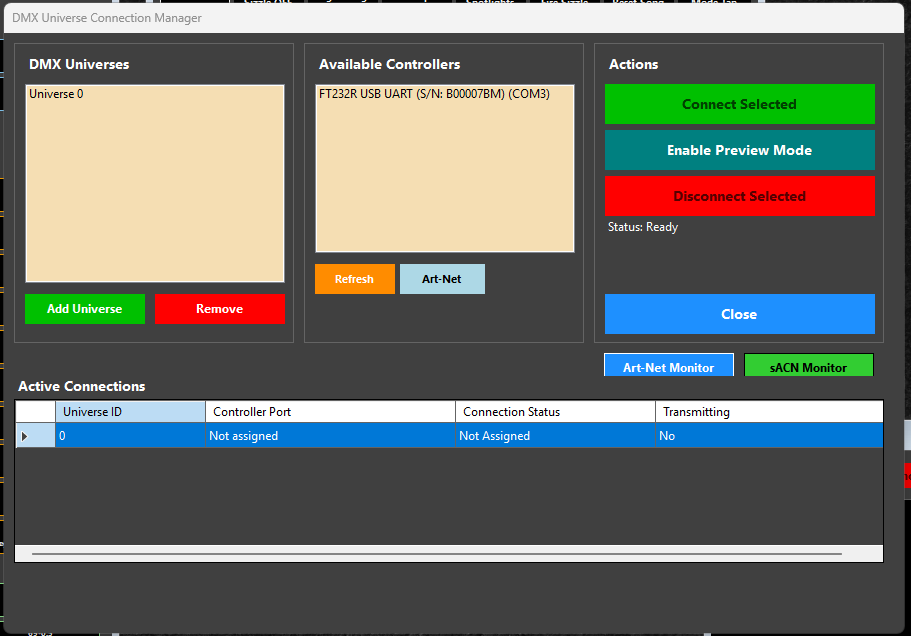
When this window comes up, you should see your controller under the “Available Controllers”. With some generic controllers, you may just see a USB port number like “Com3”. I tried to account for most USB DMX adapters’ names but not all play the same.
Click your controller name under “Available Controllers” and click “Universe 0” under “DMX Universes”. Once both of those are highlighted, click the “Connect Selected” button. You should see a message come up under the Disconnect button saying you are connected. You should also see the connection under the “Active Connections” grid. It should tell you the controller and the connection status which should be “Connected” and the Transmitting should be “Yes” at this point.
If it didn’t connect, make sure everything is plugged in still. Make sure you plug in your DMX Controller before starting GigLights. That is important. If you didn’t, just restart GigLights and see if it shows up then. There will be more troubleshooting later.
If you want to use Art-Net or sACN, that will be covered later but for now, you can click the USBbutton under the available controllers to get to Art-Net. Click again to get to sACN.
Define Your Fixtures
Now that you are connected to your DMX adapter, GigLights needs to know what DMX lights you are using and what channels they use. Since I designed GigLights to be cost effective by allowing you to use just about any inexpensive DMX light, we need to tell GigLights what we have. I didn’t see a need to have thousands of lighting profiles for lights most local bands don’t even use. Most local bands are going to have lights from Chauvet or Amazon (Chinese Built). There’s nothing wrong with using inexpensive lights. That’s all I use. They are very cost effective and if you bust one, you easily just get another. You just have to be careful because some are junk and some are not.
For defining your fixtures, it would be best if you have the manual that came with them. It will have all of the information we need to define your fixture in GigLights. If you don’t have the manual, most can be found on the internet with a little bit of hunting.
Now in this section you are just defining a fixture. If you have 10 of the same type of fixture, you only enter it here once. The DMX map will define where all 10 sit but here we just need to know about your fixture.
With that out of the way, let's define your fixtures.

We define your lights with the Fixture Manager. Bring up the fixture manager by clicking the icon that looks like the image above on the toolbar..

Your Fixture Manager will not have any entries yet. Click “New Fixture Type”.
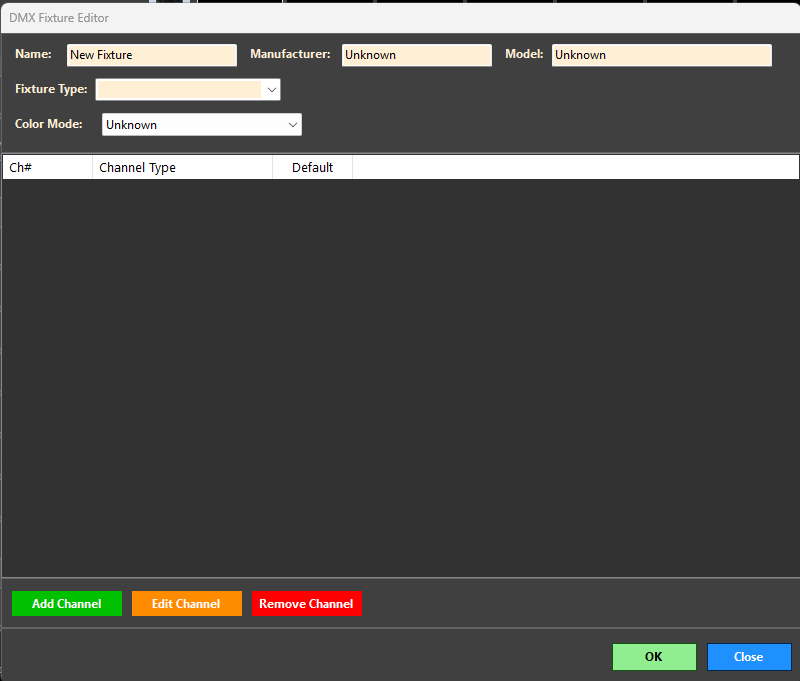
Name: Enter the name of your fixture or whatever you want to call it. If it’s a no name Chinese Fixture I suggest something like Generic RGB Flood or whatever function it does.
Manufacturer and Model: This is totally optional and you can put whatever you want in there.
Fixture Type: You must select one of these but it is not that important to get it right. It’s mainly for descriptive purposes. If it’s just a standard RGB Flood light, choose “Wash Light”. Just make sure you are close to what your fixture does.
Color Mode: This one is very important to GigLights. You have to tell GigLights how to control this light and control the colors. Your choices are “Unknown” (don’t use), Dimmer, RGB, RGB Dimmer, RGBW, RGBWA, RGBWAU, CMY, CMYK, ColorWheel, MultiCell. For most fixtures you will choose RGB but a lot of fixtures from Amazon and other places have an “Intensity” channel which allows you to set a color and dim it with the intensity value. All my lights have an intensity channel so if you have an intensity channel, use “RGB Dimmer”. This is important for GigLights to be able to light up this type of light. Just about all Generic Lights I have bought have an intensity channel. If you have a moving fixture that is not an RGB fixture, choose “color wheel”. Most inexpensive moving head fixtures have color wheels instead of RGB colors. This includes Chauvet and others. If it has RGB in the name then it may be RGB instead of a color wheel.
Now that we know what kind of fixture you have, now we need to tell GigLights what the function of each channel does and where they are located. If you have your fixture manual, this will be simple.
Click “Add Channel”.
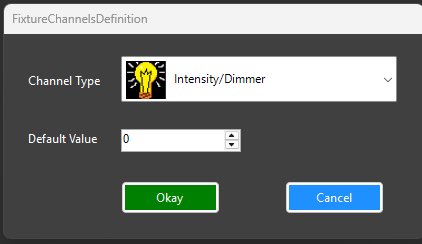
Choose the Channel Type for the first channel (Channel 1). All of my fixtures are RGB fixtures but have the Intensity channel. If your fixture has an intensity channel and is an RGB fixture, use the above channel type (Intensity/Dimmer) and set the default value to 255.
Click Okay. You have just entered your first fixture channel.
Keep entering fixture channels until you have defined all of your channels. If your fixture has 7 channels, you will have 7 channel entries. It is important to make sure you have all channels entered because GigLights needs to know the amount of channels your fixture has to do other functions coming up.
If there is a function/Channel you don’t plan on using, make it “No Function/Ignore”. I don’t use a lot of the built-in fixture functions and prefer not to use them so my last two entries are “No Function/Ignore” so GigLights doesn’t try to use them.
You can doubleclick on a channel and enter SubChannel values but that topic will be covered later.
If you have other types of fixtures, repeat this whole process for every other type of light fixture you may have. As you can see in my list above, I have 3 different types of fixtures.
Once you have all of your channels defined we will move on to setting up the DMX map that tells GigLights where your lights are sitting in the DMX Map.
Tell GigLights Where Your Lights Are – The DMX Map
The last section was about defining your fixtures. That was the hardest part in setting up GigLights. It is the same with any other lighting software. Now it only gets easier from here.

Click the button on the toolbar that looks like the button above. This is the DMX Map editor.
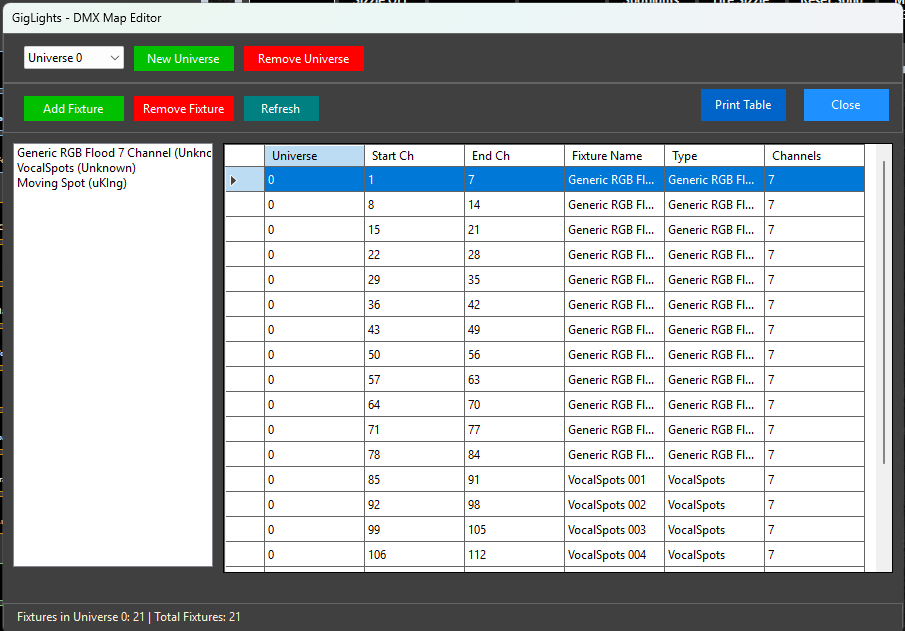
Your DMX Map grid will be empty when you bring up the DMX Map. But you should see the fixtures you just defined in the list at the left. Since you entered the channels in the fixture definition, GigLights knows how many channels your fixtures have so it can do a lot of the addressing for you.
Start by clicking on whatever fixture you want to map first. Click “Add Fixture”.
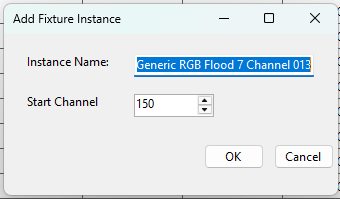
GigLights will give your fixture a number and suggest a start channel. If this is your first fixture you are putting in the map, the channel will be one. When you click okay, the fixture will be placed in the map and will show up on the grid. Keep adding them ( the same fixture type) until all of your fixtures for that fixture type have been entered. If you have 10 “GENERIC RGB Flood”, you should have 10 lines in the table starting at channel 1 and ending at channel 70 if your fixtures have 7 channels.
Next select your next fixture type in the list on the left and click add fixture. The next available DMX address will be suggested so just click okay. Repeat until you have all of your fixtures of that type entered.
If you have moving head lights, you can doubleclick one of them in the map and set limits to the pan and tilt so it doesn’t point to places you don’t want it to.
Keep doing this until all of the fixtures you own are entered.
Your DMX is complete now. GigLights now knows where every light and channel is in the DMX “Universe” and how to talk to them.
You can hit the “Print” button and print out the map. You can then take that printout to your physical lights and set the Starting Address on all of your lights according to the printout of the DMX Map.
The hard part is now over.
The Setup Wizard – Setting Up Scenes and Programs
GigLights works by using Scenes which are sets of fixtures that have values applied to them to light them up. Programs are sets of Scenes that will be run in order one after the other then repeat. They are known as “chases” in a lot of lighting systems but GigLights calls them Programs because they have more than just a chase ability. GigLights also has “Collections” which are groups of Programs but we will talk about that later.
If you had to manually setup all of the scenes and programs up, it could take you days to get enough for GigLights to perform well. I built in the Wizard that will create a ton of scenes and programs to get you started. It saves you a massive amount of time. After the wizard runs, you can edit or delete scenes and programs as you wish. You can add your own scenes and programs as well. The world of lighting is at your fingertips. The Wizard creates all of the scene and programs based on your current lighting. It looks at the DMX map and the fixtures you entered and creates a custom light show based on the amount of fixtures and their types. That is why GigLights can’t ship with all scenes created ahead of time since it doesn’t have a clue what you have until you tell it (which we did previously). It does this in the blink of an eye.
So call up the Wizard by going to the menu at the top of GigLights, click “Tools”, then click “Program Wizard”.
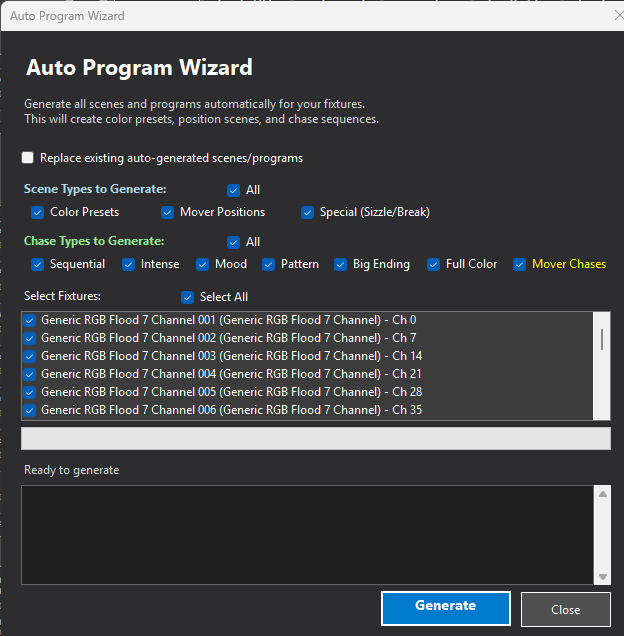
Leave everything checked. If you have lights that you do not want the wizard to include in scenes, uncheck them in the list. Otherwise, GigLights will include every fixture in the list in the scenes it creates.
Once you are ready, click “Generate” and don’t blink. You now have a ton of Scenes and Programs. This would have taken you days to create.
You will notice you now have a lot of Auto Program buttons on the left Auto Program Panel. The are all of the programs the Wizard created for you. If your dmx controller is connected and you have your lights connected and all addressed, you can click one of these buttons and you light should come on.
When you start up GigLights, it is in Manual Mode. You can click on any program and it will run that program. You can control the Program speed by tapping the Manual Tap button on the control panel.
The real magic happens though when you go into Auto Show Mode. In Auto Show Mode, GigLights controls everything. It syncs the Programs advancing to the beat of your music. It listens to the Energy of your music and chooses Programs based on Calm, Normal, Intense and /big Ending programs automatically. No lighting person required. Did your song end? GigLights knows this and switches to a “Break Scene” that comes on in between songs. No more having to stop the lights at the end of a song.
There is also a “Vocal Lights” function where you can set up a scene as “Vocal Lights” and when enabled, it will automatically turn those on when it hears vocals or at least frequencies in the vocal range. We will discuss that part a bit later.
So, in all reality, you could run just as you are now and GigLights will put on a light show for you handsfree as long as you are supplying it with a good audio level from a microphone or other source.
The Fixture Rig Viewer – The Life Saver
It’s not always convenient to have your whole lighting rig hooked up when you are working on some new scenes or programs but you want to see what your changes are doing on the lights. I created a DMX Fixture Viewer that emulates your lighting rig. That way you can actually see what GigLights is doing without actually having your lights connected. You set up your fixtures in the Viewer to be around the same positioning it would be on stage. The futures will light up just like your lights would since the viewer reads the DMX values being sent to the DMX interfaces..

Bring up the Fixture Rig Viewer by clicking its icon that looks like the image above on the tool panel.
When your Viewer comes up, it will be empty. I drag mine down to the lower right hand corner of the screen. You can resize it to any size. You will need to add your fixtures to it. To add fixtures, just click the “Edit” button. Click “Add” and you will see a list of fixtures that have not been added yet. You can also choose “circle” or “square” but I choose “circle” for all of mine. Each fixture (even though the same model) will have its own unique number in GigLights that was assigned when you created the DMX Map. Pick one of the lights and drag it to where it would physically be on stage for that one fixture. Keep clicking “Add” and positioning the fixtures on the panel until you have all of your fixtures in place.
When you are done adding all of your fixtures, click “Save Layout”. These are now permanently saved. You can however, click edit and move them if needed. Just click “Save Layout” to exit the changes.
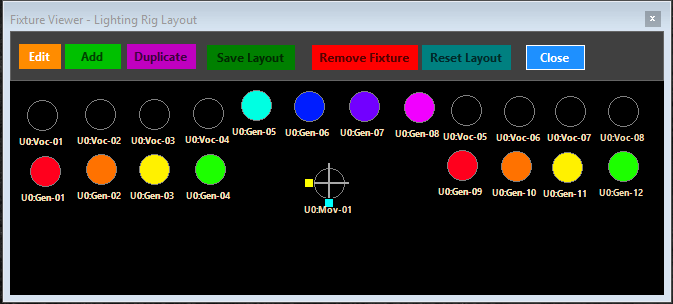
You can now click one of your auto program buttons and the fixtures on the viewer will display your lighting scenes in the program you selected.
This makes it so easy to work on your lighting without having all of your lighting rig hooked up. Believe me, you will miss it if you don’t have it. I use it constantly.
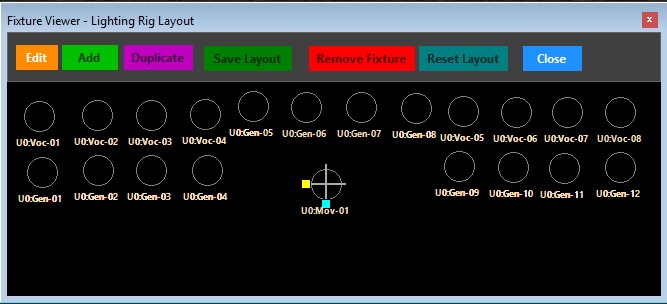
In the image above, I made a simple layout. 4 lights on a lighting tree on the left (lighting tree not shown of course). 4 lights on a lighting tree on the right. And 4 lights in the back pointing out to the dance floor. The light in the middle is a moving head light. The other lights that are not lit are vocal spotlights I didn’t turn on. The lights on the panel will act just like your lights on your lighting setup.
Let’s Roll
We have everything we need to set this all in motion. You have your DMX hooked up, You have a sound input microphone or other source. You have your fixtures defined and the DMX map created and the Wizard created all of your scenes and programs. Let's Roll.
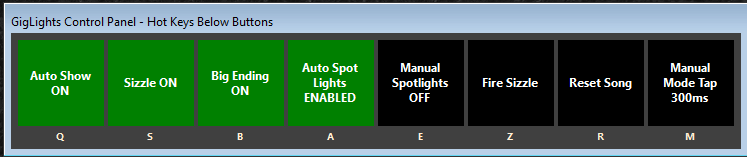
Control Panel Basics
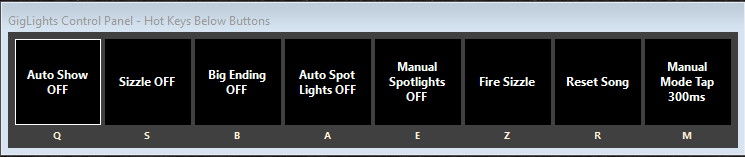
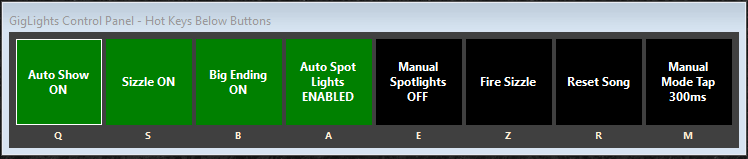
Above is the Control Panel. This controls a lot of the things GigLights can do.
Auto Show Button – is what GigLights is all about. Full Auto Show on or off
Sizzle – Adds strobe accents during crescendo moments.
Big Ending – GigLights can sense when a lot of action is happening and may fire the Big Ending scenes.
Auto Spot Lights – Automatically turn vocal lights on or off when vocal frequencies are sensed or not.
Fire Sizzle – Fires sizzle scene when clicked.
Reset Song – Reset current song parameters.
Manual Tap – Tempo speed for manual mode.
To start the show, click the “Auto Show “ button. The first 4 buttons will turn green indicating they are on. You can also hit one of the hotkeys below the button by typing the letter.
You are now in Auto Show mode. If you play music loud enough for GigLights to hear, it will come out of break mode and start running the programs. Once the music stops, it will go back into “Break” mode. “Break” is the scene displayed when you are in between songs.
If GigLights is not coming out of break mode, there is a 10dB boost you can click to make your input louder. If it is checked, it is on. You may need to turn up your computer's input volume. Every computer and microphone is different so for some PCs you need to turn the computer input volume all the way up. The volume should be hitting at least ¼ of the way on the volume bar on the “Intelligent Audio Analyzer” window for GigLights to work properly.
GigLights needs good clean volume to operate correctly. Getting the input adjusted correctly will make your show run better than having really bad sound coming in. The Audio Analyzer is looking for a lot of things and having clean audio coming in will help it tremendously.
If you have the volume setup correctly and are playing music, GigLights should be putting on a light show for you.
If it cannot sync to the beat or stay close to the beat, the volume coming in is probably too loud. Turn down your PC input volume a bit.
If it never goes to intense programs or stays in calm programs even though the music is not calm, you may need to increase the input volume.
GigLights has an AGC leveler on the input but it can only do so much, so getting the input volume to a good level makes a difference.
Editing A Program
If you don’t like what a program is doing, you can change or edit it to your liking or you can even delete it. I created the Unified Manager which allows you to edit scenes and programs in one interface.

Click the icon on the toolbar that looks like the image above.
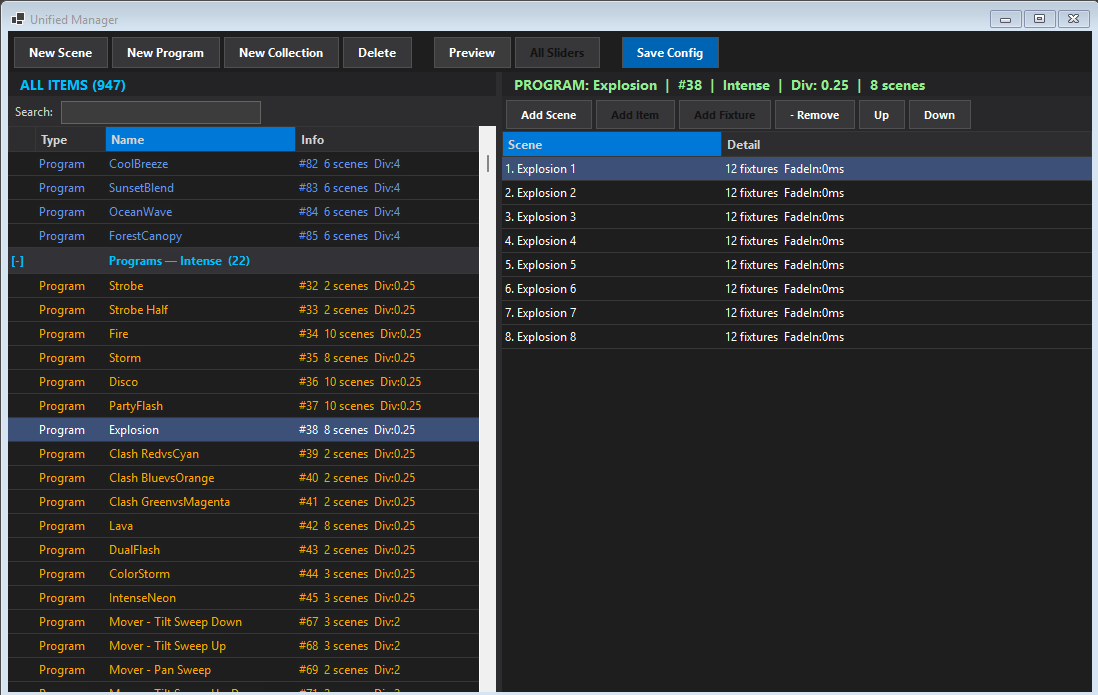
This is the Unified Manager. It allows you to edit, delete, adjust any scene, program or collection. To edit a program, just click the program name and you will see all the scenes that are in that program. Doubleclick one of the scenes and a page of sliders will pop up allowing you to adjust all of the channels on all of the fixtures in the scene.
You can click the preview button and the scene will be displayed on your fixtures and the Fixture Rig Viewer. Makes your adjustments then click “Close”
Creating a New Scene
If you want to create a new scene, click the “New Scene” button at the top.
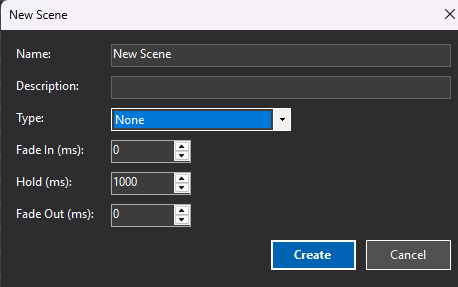
Name: Give the scene a name – If you are making scenes for a Program, use the same name
but put a number at the end. That will make them easier to find when creating a program.
Description: Type anything you want here.
Type: This is important. Select what type of scene it needs to be. None, Auto-Program,
Non-Program, Sizzle, Break or Auto-Spot. You can only have one Sizzle, Break and
Auto-Spot and you already have a Sizzle and Break when you ran the Wizard.
If this scene is going to be part of an Auto-Program, set type to Auto-Program.
Fade In: These control how the lights come on or fade in
Hold : This is how long to wait before fade out
Fade Out: How long it takes for the lights to fade out to black
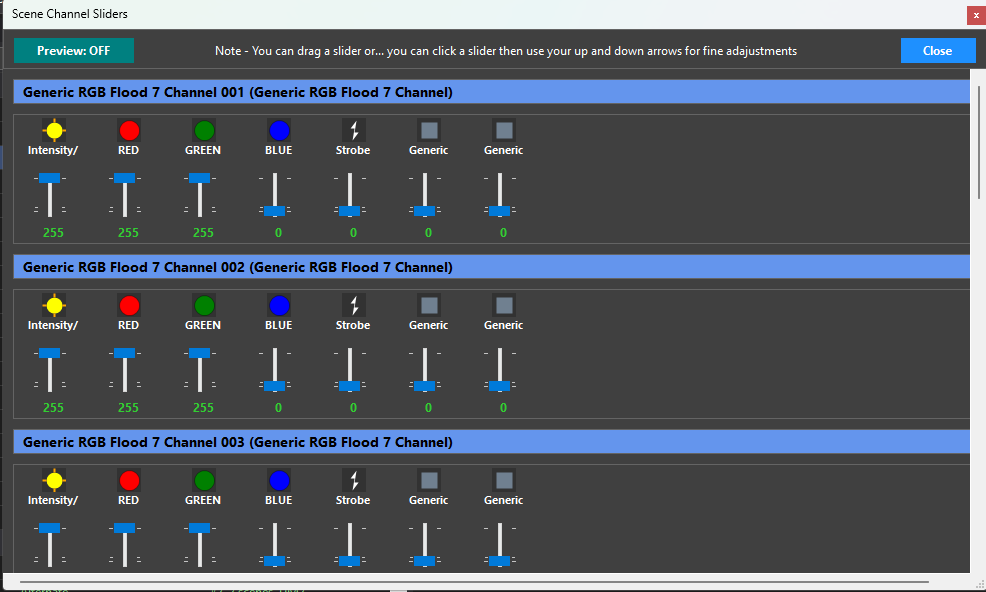
Click “Create” to make the new scene. Now we need to add fixtures to the scene. Click the “Add Fixture button. Select all fixtures you want into the scene. You can click and drag to select fixtures or hold control and click each one you want. Once all the fixtures you want are selected, click “Add Selected” and the will be put in the list. Next you need to set the values of the fixtures. You can do them one at a time by doubleclicking the fixture and setting the sliders to the values you want or click the “All Sliders” button at the top and adjust them all on one screen.
You now have a new scene. A quick tip, if you are creating scenes for a program and you need a few, use the clone button which will clone the selected scene, then just make modifications to the fixture settings in each. That’s an easy way to make a lot of scenes for a program.
Creating A New Program
Creating a new program is performed just like creating a scene. Click the New Program Button.
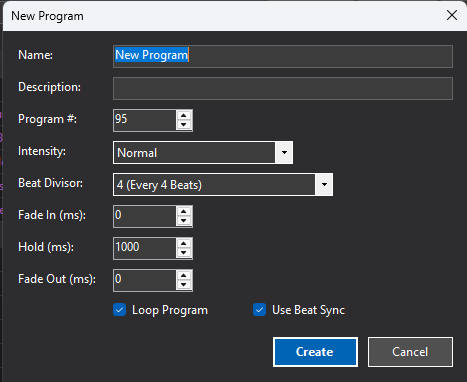
Name: Give your program a name.
Description: Optional – whatever you want here
Program #: This has been assigned already so no need to change it.
Intensity: This can be No Auto Program, Calm, Normal, Intense or Big Ending
Beat Divisor: This determines when the programs chase advances.
8 = every 8 beats,
4 = every 4 beats,
2 = every 2 beats,
1 = every 1 beat,
.5 = every ½ beat,
.25 = every ¼ beat,
.125 = every ⅛ beat
Fade in: The time it takes to fade in the light
Hold: The time to hold before fading out
Fade Out: How long it takes to fade out to black.
Once you click “Create”, the program is created. Now you must add scenes to the programs. Click the “Add Scene” button.
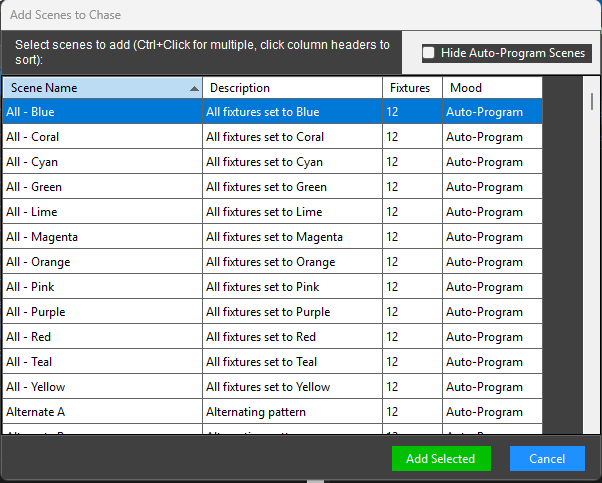
If you want to see all the scenes, uncheck the “Hide Auto-Program Scenes”. Select the scenes you want to include in the program by clicking a scene and dragging to select multiple scenes or by holding down the control key and clicking the scenes you want to include. Click add selected when finished.
You now have a new Program and it will now have a program button in the Auto-Program button panel on the left.
Creating Collections
A Collection is a group of programs that can run at the same time. They are created the same way as creating a scene or program. Click the “New Collection” Button.
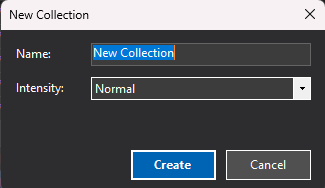
Give it a name and select the intensity (calm, normal, intense or big ending). Click “Create”. Now just add the programs you want to be in this collection by clicking the “Add Item” button. They will then show up in the right list.
It’s as easy as that.
Non Program Scene Viewer
I have built in another way to bring up some scenes for certain situations. For instance, bringing up house lights and other fixtures that may not be part of the light show. These are normally things for more permanent installations or clubs but also could have some use during a show (like shooting some haze out or turning on/off lights you may want direct control of like a normal lighting software would). So I created the Non-Program Scene Viewer.

Click the icon on the toolbar that looks like the above image.

This panel allows you to run Scenes and Collections manually. It has 2 sides. The left side runs scenes and collections “Exclusively” meaning only one button can be on at a time. If you have one scene on and click another button, the previous button is turned off.
On the right side, buttons are “Layered”, This means any button can be on at the same time as another button. This is handy for “house lights” or other uses. All buttons on this side can be on at the same time.
Adding buttons to this works just like the Fixture Rig Viewer. Click “Edit” to add buttons to the panel and drag them where you want them. Once you have everything you want on there, click “Save Layout” and you can start using them immediately.
The window can be resized to whatever size you want and its position and size will be remembered.
The Program Button Panel Indepth
The Program Button Panel is the main control for GigLights.
This panel contains the buttons that enable and disable certain features of GigLights.
Auto Show (On/Off) | This button turns on the main feature of GigLights,… The Auto Show Mode. In this mode, GigLights will control everything hands free. Enabling this also turns on Sizzle, Big Ending and Auto Spotlights. |
Sizzle (On/Off) | The turns on the Sizzle Strobe that will fire when high frequency energies are detected and it will strobe a Sizzle scene 3 quick times like a strobe or one flash depending on the settings in the settings form. |
Big Ending (On/Off) | This turns on the Big Ending detection that will look for Big Endings or high full spectrum energy and turn on a Big Ending Scene it chooses. |
Auto Spotlights (On/Off) | If you have vocal spotlights and have a scene setup as a vocal spotlight type, this button will turn on the auto vocal spotlight function which will turn on the vocal spotlights when voice frequencies are heard above a certain level. Music will also trigger these in some cases when the music has voice frequencies in it. |
Manual SpotLights | If you want to keep the vocal spotlights on, during a speech or something without fading out during pauses, click this button to keep them on. |
Fire Sizzle | This button will fire the Sizzle strobe scene anytime you click the button or hit the hot key. |
Reset Song | GigLights listens to your music as it is being played and builds up certain numbers over time. If you feel GigLights is not reacting correctly to your music or it never got to do a break scene, you can click this button to reset the song back to break status. When music ends and the break scene comes on, that also resets all of the parameters GigLights has collected and tracked for the previous song, starting over for any new song. Reset song sets GigLights back to this state even if in the middle of a song. |
Manual Mode Tap | When the Auto Show is not running, everything is in Manual Mode. Scenes in the Program Panel can be clicked with a mouse in Manual Mode. The Manual Mode Tap sets the chase advance speed when in manual mode. |
Control Panel Hot Keys
The control panels buttons have hot keys assigned. You can just press one of the hot keys to turn the button on or off. Hot keys are shown below the button. You can also assign MIDI notes to these keys also so a MINI controller can turn them on or off. Hot key assignment changes and MIDI set/changes is done with routines under the Edit Menu.
Other Fun Stuff Built Into GigLights
We’re not done with everything GigLights has built in. First let’s go over some of the features just to make sure you are aware of what’s packed in this puppy.
Intelligent Audio Analyzer |
|
DMX Controller Config |
|
Chase Engine & Tempo Control |
|
Scene & Program Management |
|
Advanced Lighting Effects |
|
Fixture Rig Simulator |
|
MIDI and Hot Keys Complete Hands Free |
|
DMX Monitor | Screen to show what exactly is going to the DMX Channels |
Fixture Repair Tool | If a fixture’s config gets messed up for some reason in the config file, the repair tool may be able to fix it. |
Config File Repair Tool | If the config file gets messed up for some reason, the repair tool should be able to fix it. |
Collect Windows Tool | Sometimes when you go from one pc to another, your windows may get positioned off the screen. The collect windows too moves all windows to the left so you can see them and move them to another place. |
Channel Sliders | A simple utility to be able to set a DMX value across any part of the 512 channels of a universe. Channels are shown 8 at a time with sliders to adjust the value of the channels. Good for Diagnostic use. |
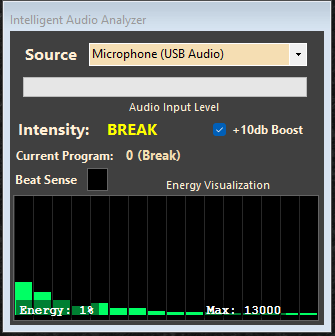
Intelligent Audio Analyzer
The intelligent Audio Analyzer is responsible for listening to your music, finding the beat and syncing to it. It also analyzes the music energy and selects the appropriate program to run at that point in time. It also senses when there is a break between songs (break scene), senses high energy crescendos and fires a strobe effect (cymbals and other high sounds) called sizzle scene and can detect when there is really high energy at the end of a song and if it is detected, it fires the one of the big ending scenes.
The intelligent Audio Analyzer does a lot of work behind the scenes and does some amazing stuff. I worked hard getting this to do what it does and it really performs well. It contains a few controls but not much is needed since it has a lot of mechanisms built in to handle just about anything thrown at it.
The Source is for choosing your audio input on your pc. If you are using a USB Microphone input adapter, plug it in first before starting up GigLights. GigLights won’t see it if it’s not plugged in first. Select the source from the drop down list. If using a USB microphone adapter, you may see what is in the drop down above. That is what I use.
The only other control is the +10dB Boost checkbox. It is on by default. This adds an extra boost for the microphone since the microphones I use are normal SM58s or something like it and they need a bit of a boost. I also sometimes use a small mixer but it’s not necessary.
The Intelligent Audio Analyzer shows energy bands by frequency range just for reference. You can see the hottest frequencies and the coolest. This graph is for visual display only and does not reflect actual analysis behind the scenes.
The Beat sense “Light” is just an indicator that has enough info to detect a beat. IT IS NOT A BEAT INDICATOR. It will not flash in time with the beat most times. It is just an indicator that says, “yeah, I got enough to sense a beat”.
The Intensity indicator displays what is being sent to the program selector to play the appropriate program.
The audio input level bar meter displays the level of the audio coming in. It only needs to run about 25% of the bar for GigLights to work. It doesn't have to cover the whole thing like most bar graphs.
The Max number you see on the energy bar graph is just for reference and is used to judge if the music energy is going over the base level. It’s not really important for most people but it just indicates if volume has progressed past the point of the base. If it does, that is good, If it doesn’t and the music is not subtle, you might need more volume coming in.
The Auto Program Button Panel
This panel shows all of the Auto Programs that GigLights is going to use to automatically run your lights.
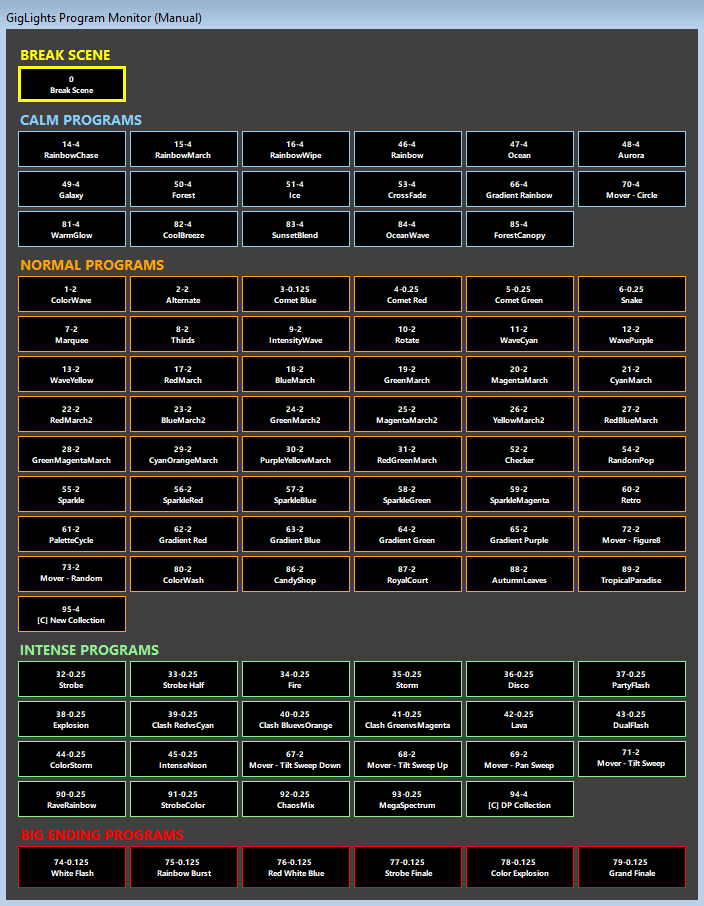
It is divided into sections…. Break Scene, Calm, Normal, Intense and Big Ending programs. In Manual Mode (Auto Show = Off), you can click on any button and run that program. The Manual Tap button on the control panel controls the speed.
When Auto Show is On, GigLights will listen to your music and select program buttons based on your music’s energy. You will see it jump around when different parts of songs are played. If a song is not very dynamic, it may just stay in one category for a long time. If the music is very dynamic, it may jump around a lot.
The buttons display the Program Number, a dash, then the Beat Divisor that is set for that program. It also has the name of the actual program. You can read about the beat divisor earlier in this document. It basically is how the program's scenes are advanced by 1 beat, 2 beats,4 beat,etc.
When in Auto Show Mode, there is not much for you to do but watch it change programs. You cannot click anything in this panel when the Auto Show is On.
The top title of the panel lets you know if you are in Manual or Auto Show mode.
The Settings Panel
GigLights has a settings section that allows you to make adjustments to many of the Intelligent Audio Analyzer parameters. But…I only suggest you adjust any of these unless you absolutely have to.
These settings, if set incorrectly, will completely destroy GigLights ability to sync to the beat, analyze the energy among other things. So if you plan on changing any of these, only make small changes at a time. First, document all of the existing settings. I still will make very small changes to fine tune to my bands music sometimes but once set, you shouldn’t have to touch the settings again. The only reason I even provide these settings is for fine tuning. I may even remove them from future editions of GigLights.
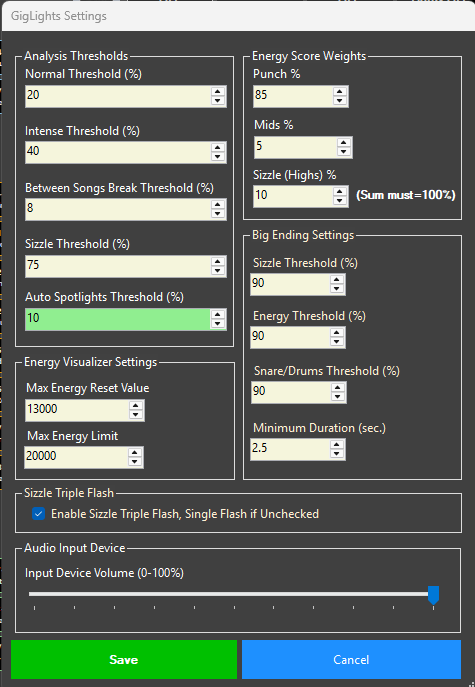
Analysis Thresholds | |
Normal Threshold | The threshold level where GigLights will switch from Calm to Normal Intensity. |
Intense Threshold | The threshold level where GigLights will switch from Normal to Intense Intensity. |
Between Song Break Threshold | The threshold that the energy level must drop below to trigger the Break Scene. |
Sizzle Threshold | The threshold that must be broken to trigger the Sizzle Scene routine. |
Auto Spotlights Threshold | The threshold that must be hit by vocal frequencies to turn on the Vocal Spotlights Scene. |
Energy Visualizer Settings | |
I suggest not changing these values | |
Max Energy Reset Value | When a new song starts, preset the max energy level to this amount (to keep it jumping to intense too soon). |
Max Energy Limit | The upper limit that the variable energy scale can hit. This keeps the Energy level range at a good level. It’s okay for the energy visualizer to go above this. |
Energy Score Weights | |
Punch % | The Amount of Punch that affect the Beat Sensing |
Mids % | The Amount of Mid Frequencies that affect the Beat Sensing |
Sizzle % | The Amount of Sizzle that affect the Beat Sensing |
Big Ending Settings | |
Sizzle Threshold | The Amount of Sizzle that affects the Big Ending Trigger |
Energy Threshold | The Amount of Energy that affects the Big Ending Trigger |
Snare/Drum Threshold | The Amount of Snare/Drums that affects the Big Ending Trigger |
Minimum Duration | Must happen Longer than this amount to trigger Big Ending |
Sizzle Triple Flash | |
Enable Sizzle Triple Flash | If checked, when the Sizzle Scene fires, it flashes 3 times like a strobe. If unchecked, it flashes once. |
Audio Input Device | |
Input Device Volume | Adjusts the PC system audio input volume |
Connections Extras
We covered connecting a DMX controller to GigLights for basic USB DMX controllers. If you want to use Art-Net or sACN to connect through a network interface, GigLights is set up for that. You get to those interfaces by clicking the USB button under the Available Controllers Section.
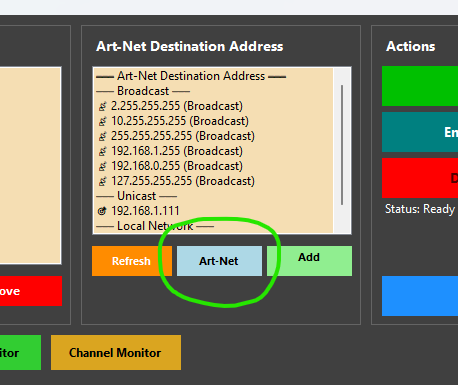
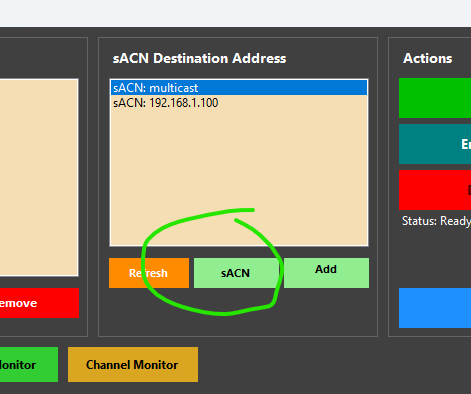
It changes to a different protocol as you click the same button. For either one, choose the correct IP address for your interface and connect.
Unified Manager – Indepth
The Unified Manager is responsible for creating, editing and deleting Scenes, Programs and Collections.
At the top you will see buttons labeled “New Scene”, “New Program”, “New Collection". These are used pretty much to do what they say. Create scenes, programs and collections. The left column shows all the existing programs, scenes and collections that are configured into GigLights. The right column will show whatever is contained in the chosen program, scene or collection on the left.
Programs
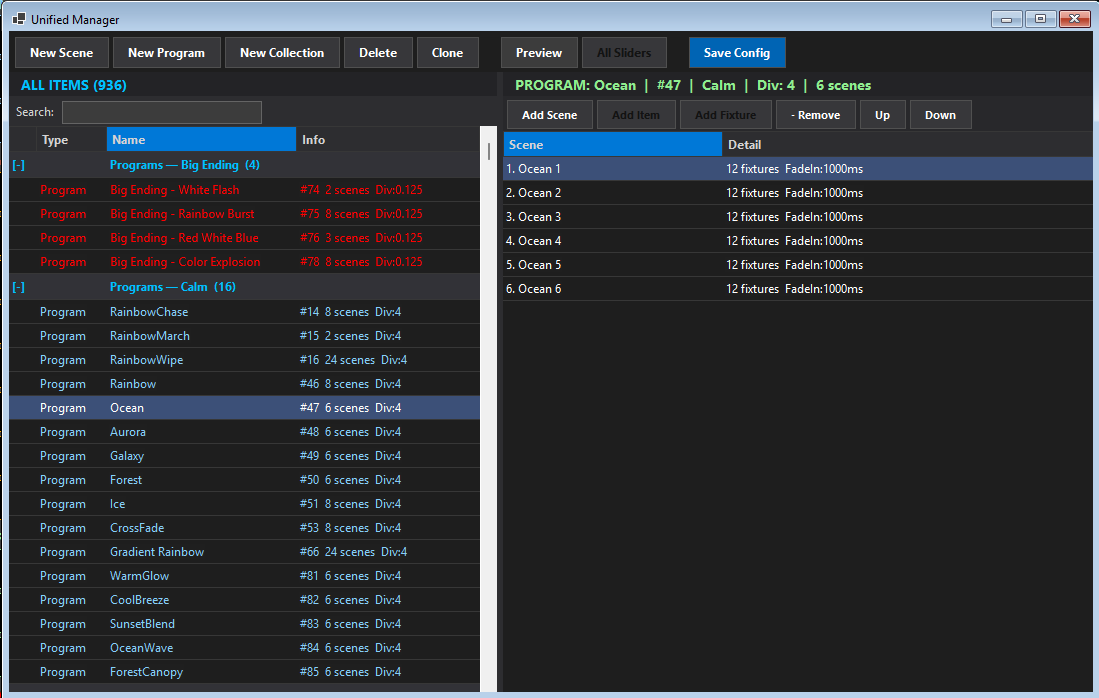
Above, you can see I have the program “Ocean” selected. The right column shows all of the scenes that are contained in that program. I can add another scene with the “Add Scene” button at the top of the list, I can also delete a scene by clicking the Remove button. I can also move the scene up or down in the list with the up and down buttons.
Notice the green info above the right list. It shows the program name, the program number, the intensity, the beat divisor and how many scenes are in that program.
I could add a new program by clicking the “New Program” button. I would need to fill out all of the info. That was all covered creating a new program section previously in this document.
Scenes
Scenes are managed exactly the same as programs except the right list will show all the “fixtures” that are in the scene.
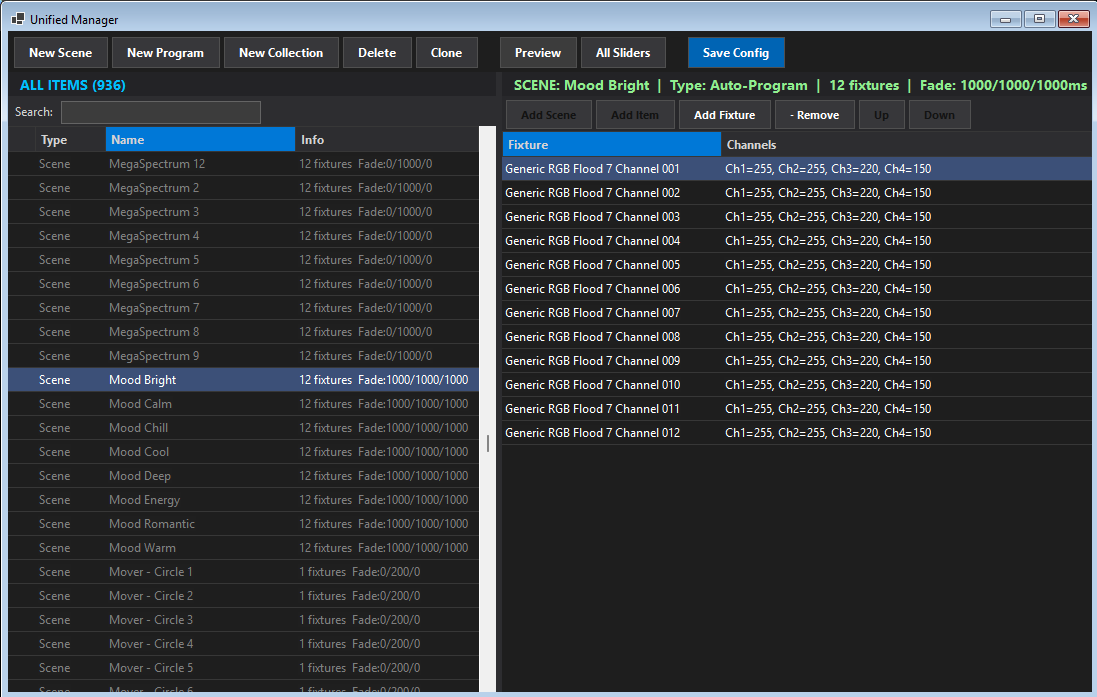
As you can see above, I have selected a scene called Mood Bright. All of it’s info is shown in green above the right list. It’s name is “Mood Bright”, It is a Auto-Program type, it has 12 fixtures in it, fade in time is 1000, hold time is 1000 and fade out time is 1000ms.
All 12 fixtures are listed in the right list. You can see at a glance what the channels are set to in the channels column of the right list. You can double-click on one to bring up the channel sliders for that fixture…
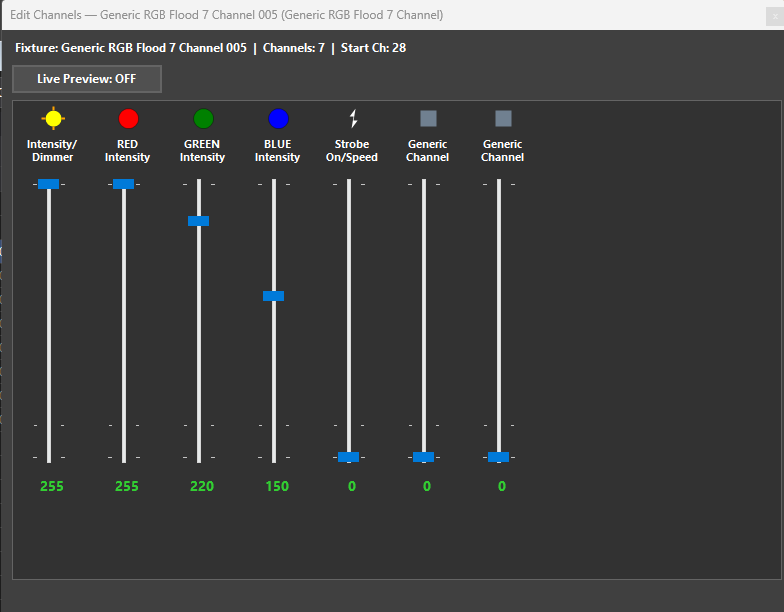
You can see what values the channel sliders are set to for that fixture. You can slide them up and down to change them. You can click the “Live Preview” button to see what the fixture is actually doing. View it directly on your lights or use the Fixture Rig Viewer. Just click the X when you are done
If you want to adjust more than one, you can bring up the sliders for all the fixtures in the scene by clicking the “All Sliders” button on the Unified Manager buttons at the top. All Siders will have sliders for every fixture in the scene.
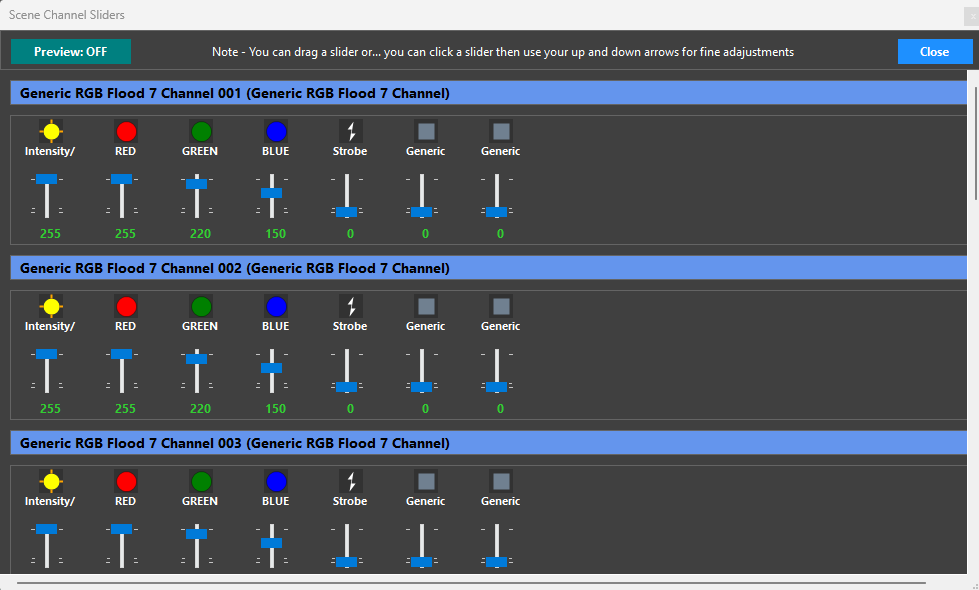
You can move the sliders with your mouse or position the mouse over it and use your scroll wheel to move it up or down or use your key up and Key down arrows to move it up or down. Once down, click the Close button.
Collections
Collections work exactly like scenes except you are adding programs instead of fixtures. You do need to add the “header” info like you would for a program like Name, Intensity, and program number but program number will be filled in for you. gigLights finds the next available program number and populates it into the field for you.
Final Thoughts about Unified Manager
The Unified Manager is your one stop shop for all things scenes, programs and collections. If you create a new Program or a new Collection, they will get a button in the Auto-Program button panel. With programs, you do have to set the type to Auto Program for them to get a button.
GigLights Helpful Tips
Between Songs Break Threshold
There may be times when you are playing a gig and the place is louder than normal. This may cause GigLights to never go into break mode. To fix this there are a few things you can do. First, try to keep your microphone pointed away from the crowd as much as possible so you are not picking them up extremely loud. If you are a good band, chances are people are screaming and yelling after a song is over so noise is expected. You can also bump up the “Between Songs Break Threshold” a couple percentage numbers at a time until it finally goes to break when a song stops. This may have to be adjusted per venue because some venues absorb the sound better than others.
Mini Microphone Mixer
I just started using a mini microphone mixer just to help aid in setup. One of my bands tends to get a bit louder as the night goes on (and the beers go in) so, just to make sure GigLights isn’t getting overwhelmed, I can just turn the microphone down on the mixer a tiny bit. Just very small adjustments. It doesn’t happen a lot and for me, it’s just an insurance policy. GigLights handles increases in volume very well do to the built in AGC process but I like to have a little insurance just in case where I can quickly adjust if need be.
Make All Connections First
To make sure you have no issues, hook all of your adapters up first before starting GigLights (or even better, before turning on your pc or laptop). This way you are sure that GigLights will find you DMX adapter and Microphone setup without having to stop and restart it. GigLights remembers your last used interfaces so it will be looking for them when it starts up.
Non-Program Scene Viewer Panel
If you want to use the Non-Program Scene Viewer panel, you must have Non-Program Scenes or Collections available or there won’t be anything to add. Create a new scene and set the type to Non-Program. Add some fixtures and set some colors. Now when you go to the Non-Program Viewer Panel, you will be able to add it. The Wizard does not create any non-program stuff. That’s all up to you and your imagination.
Moving Head Limits
This was mentioned briefly before but if you have moving head fixtures and you don’t want them beaming everywhere including behind on the wall, you can set limits to where the pan and tilt can go. Just go to the DMX Map, find your moving head and doubleclick it. You will get a popup that allows you to set limits for the pan and tilt of that particular fixture. The reason it’s set at the DMX Map level and not the fixture level is you will probably want different values set depending on where the fixture sits on your stage.
Moving Scenes Created By The Wizard
The Wizard creates some moving head scenes if the check box for them is checked. These are just some basic moves that a moving head can perform. You will probably want to edit them but most of all, you will probably want to make the moving head programs part of the collection with your normal lights. The moving head scenes the wizard creates are the moving head only. You probably want other stage lights on at the same time so you can put these moving head programs into a collection with another RGB light program or scene. It’s up to you. It may look a little weird if all of your lights shut off when a moving head program comes on by itself.
Why Do I Need Collections
Aside from the example above, you may want to combine a chasing scene with bright colors with a dim blue scene or something like that. It just gives you another platform for being an artist and combining colors in unusual ways. You could even use 2 programs that have fast chases for a really random chaotic look. Use your imagination.
Sometimes GigLights Starts Programs While I’m Talking
Well, since your voice is in the same frequency range as instruments, that is one issue. When you talk, you may be talking in a fast paced rhythmic way so GigLights says, I see the right frequencies and I see a constant rhythm so maybe the song has started so I better get busy.
This is going to happen inevitably. GigLights hears what it needs to sync and read the energy from your voice. You sound like music. So one way to prevent this if you are going to speak for a short while is to turn off the Auto Show while the talking is going on. It’s very easy. You can use the hot key (defaultly Q right now). You can hook up a MIDI controller (That is the only reason I built MIDI into GigLights) or even a simple page turner pedal that will output the letter Q. Or, simply hit Q on the keyboard. Once the talking is done, hit it again and Auto Show is back on. The thing about this is, if you are talking, you are not playing, so you have time to hit 1 key on the pc keyboard and you have time to hit it again just before you start playing.
I feel MIDI is overkill just to control a few buttons on the control panel but I knew someone was probably going to request it so I put MIDI support in there.
Use Clone – A Lot
If you want to speed up your time making scenes, find one that does close to what you want then “Clone It”. A clone is an exact copy of the scene you cloned except the word COPY is in the title. You can change the name then change the values of the slider to be what you want you new scene to be. It’s all about saving time.
If you are making a program that has multiple scenes for a chase, cloning is the only way to create all those scenes if you want to save time. Just make a scene called something like “Wild Scatter” and put numbers after the name so you know all “Wild Scatters” belong to a program. So you would have “Wild Scatter 01”, “Wild Scatter 02”, “Wild Scatter 03”, etc… for however many scenes you want in that program. If all of the scenes are going to be in an Auto Program, make sure you make each scene and auto-program scene and also make the program itself an auto-program type.
Delete What You Don’t Want
The Wizard creates a lot of different types of auto programs, some you may love, some you may not. You are not locked into keeping whatever you don’t want. If you don’t like a program, delete it… or edit/change it. It’s your band, your music, your lights. The only reason I made the Wizard was to get you started quickly. You can remove one or all of the programs the wizard created. But… just make sure you leave enough of a variety for GigLights to choose programs to run. Don’t limit it to like… 3 programs per intensity type. Give it a big variety of programs to choose from. You will have a better light show if you do.
Try Changing the Beat Divisor
Sometimes just changing the Beat Divisor on the program may be enough to make you like the program you currently dislike. Each program has a beat divisor set. The beat divisor says, advance the chase after “n” beats. You can set it to 8, 4, 2, 1, ½, ¼, ⅛ . This completely changes the character of a program. 8 means advance the change after 8 beats. Calm programs are usually set to 4 (advance chase after 4 beats). The fractionals say advance the chase after a half note, quarter note or eighth note. Fractionals are actually running faster than the actual beat (that was a difficult one to pull off) 🙂.
You Don’t Always Need To Use Beat Sync
Beat Sync is what keeps everything synced to the beat of your music. If you have a single fixture chase going on in a particular program, advancing 1 fixture per beat may be too slow. You can set the program to NOT use the beat sync engine and just run. The speed of the chase is then controlled by the “Hold” Time of the program. To get a fast sequence to be really fast in the program you want to modify, uncheck the “Use Beat Sync” and set the hold time to like 100ms. That will make that chase fly really fast. It won’t be tied to the beat but really fast chases don’t need to be.
Just a reminder, to get to those program settings to set the hold time and beat sync, just doubleclick the program in the list of the unified manager.
Config Files
GigLights keeps all of the scenes, programs, collections, fixtures, hot keys, midi config, connection info and DMX mapping in a config file. You can back this file up by clicking the Save Config File Icon on the toolbar. The normal config file name is Giglights-Config.json. Give it a different name and click “Save”. You can load this backup file by clicking the “Open Config File” icon on the toolbar. Select the file you named previously and click “Open”. The settings will load and it will inform you if it was successful.
You can also keep multiple files on hand for different configurations. Just remember… GigLights always saves its data to GigLights-Config.json. If you load a backup file, make some changes and then want to save those changes to the backup file, you must click the save config file icon and choose the backup filename to save the changes to that file. I may change this functionality in the future but this is the way it is for now. If you load a backup and make changes, those changes are written to GigLights-Config.json.
Fade Ins and Fade Outs
If you make a scene and you want it to fade in, use the fade in and fade out settings. These are in milliseconds so 1000 would be 1 second. 3000 would fade in very slowly. 3000 for fade out would fade out very slowly. The same works for programs. On calm programs I use like a 1000 or 2000ms fade in and fade out to make scenes fade from one scene to the next. These add some professionalism to your light shows by having lights glide to other scenes. They work for the Non Program panel buttons also.
Terms Used In GigLights
DMX | DMX (Digital Multiplex) is the universal language used to control stage lighting and effects from a central console or computer. It works by sending digital instructions through a daisy-chained cable to various fixtures, such as spotlights, moving heads, and fog machines. Each "universe" of DMX contains 512 individual channels, and every fixture is assigned a specific starting address to listen for its own commands—like color, brightness, or movement. This standardized system allows equipment from different manufacturers to work together seamlessly, giving designers precise, synchronized control over an entire production's visual atmosphere. |
Scene | A group of fixtures that have their values set to certain colors or no color at all. Each fixture can be set differently. |
Program | A program contains a group of scenes that will be played in succession like a chase or sequence would. |
Collection | A group of programs and scenes that will be played at the same time. |
Unified Manager | The place where you add, delete and modify scenes, programs and collections |
Auto Program | A program that will be called by the GigLights Audio Analyzer Engine |
Non Program | A program that will not be used by the GigLights Audio Analyzer Engine. It instead can be used in the Non Program Panel. You can use Non Program Scenes and Collections in the Non Program panel also. |
Auto Show | GigLights performs its magic when Auto Show is on by listening to what your band is playing, syncing to your beat and choosing programs based on your songs energy. |
Break Scene | A scene that GigLights will default to when there is no music and the audio level drops below a certain percentage. A break scene in between songs basically. |
Sizzle scene | A strobe scene fired when high certain frequency elements are detected |
Vocal Spotlight Scene | A special scene made for Vocal Spotlights if you have them. It is automated to turn on and off when it hears vocal frequencies. |
USB DMX | A USB DMX interface (or dongle) acts as a high-speed hardware bridge that translates digital commands from computer-based lighting software into the DMX512 protocol, the universal industry standard for stage automation. By connecting via USB, it enables a PC or Mac to precisely control a single "universe" of up to 512 individual channels, allowing for the independent management of equipment such as RGB LED fixtures, moving heads, and dimmers. These devices range from "Open" models that rely on the computer's CPU for signal timing to professional "Pro" interfaces featuring onboard microprocessors for flicker-free performance and electrical isolation to protect the host computer from power surges. |
Art-Net | Art-Net is a royalty-free communication protocol that transmits DMX512 lighting control data over standard Ethernet networks using UDP/IP packets. Developed by Artistic Licence, it acts as a high-capacity bridge that overcomes the physical distance and cable limitations of traditional DMX by allowing thousands of universes to be carried over a single network line. In a typical setup, a lighting console or computer sends Art-Net data to "nodes"—Ethernet-to-DMX converters—which then translates the network signal back into standard XLR-based DMX for local fixtures. This protocol is the industry standard for simplifying complex wiring in professional stage environments and is essential for high-channel-count applications like pixel mapping. |
sACN | sACN (Streaming Architecture for Control Networks), also known by its technical standard ANSI E1.31, is a network protocol designed to transport massive amounts of DMX data over Ethernet. Unlike Art-Net, sACN was specifically developed by the industry to handle large-scale shows by utilizing multicast data transmission, which prevents the network from being flooded by only sending data to the devices that need it. It is highly favored for its robust priority system, allowing multiple consoles to be connected simultaneously while the system automatically favors the primary controller. This makes it the professional choice for permanent installations and complex live events where network efficiency and redundant backup control are critical. |
Fixture | In stage lighting, a fixture is any individual piece of equipment that produces or manipulates light, such as a spotlight, wash light, or moving head. Unlike a simple household lamp, a stage fixture is a specialized device designed to be controlled remotely via a console, featuring internal components like dimmers, color-mixing systems, and motors. Each fixture occupies a specific footprint on a DMX universe, using various channels to receive commands for attributes like intensity, beam angle, and strobe effects. Whether it is a static LED bar or a complex robotic light, the fixture serves as the fundamental building block of a lighting designer’s rig. |
DMX Map | A DMX map (also known as a DMX chart or profile) is a technical reference that outlines how a lighting fixture’s specific features are assigned to individual control channels. Since a single fixture can occupy multiple channels, the map tells the lighting console exactly which channel regulates a certain attribute, such as intensity, color, or movement. For example, a map might designate channel 1 for brightness, channel 2 for red, and channel 3 for blue; without this specific guide, the controller wouldn't know how to "talk" to the light correctly. Essentially, it acts as the translation key that allows the software to align its sliders and buttons with the physical capabilities of the hardware. |
USB Microphone Adapter | A USB microphone adapter is a compact device that acts as a bridge between a traditional analog microphone and a computer's digital USB port. It functions as an external sound card, containing a preamp to boost the microphone’s signal and an analog-to-digital converter to translate sound waves into data the computer can process. These adapters typically feature a standard XLR or 3.5mm input on one end and a USB plug on the other, allowing users to connect professional-grade recording equipment to a PC or Mac without needing a large, multi-channel audio interface. Many models also include a built-in headphone jack for zero-latency monitoring, making them a convenient, portable solution for podcasting, streaming, and voiceover work. |
Beat Divisor | In the context of lighting and music synchronization, a beat divisor is a setting that determines how frequently a lighting effect triggers relative to the musical beat. It works by mathematically dividing the detected tempo (BPM) so that an action occurs only on a fraction of the beats—for example, a divisor of four would trigger a light change only on every fourth beat (the start of each measure). This is essential for creating visual variety, as it prevents lights from flashing too frantically on every single beat, allowing the designer to synchronize slower movements or color transitions that feel rhythmically connected to the music's structure. |
Fade In Time | Fade-in time is the specific duration it takes for a lighting fixture or an entire look to transition from zero intensity (or a previous state) to its full target brightness. Instead of the lights snapping on instantly, a fade-in time creates a smooth, gradual increase in light, measured in seconds or fractions of a second. This setting is crucial for establishing the mood and pacing of a performance, allowing for subtle transitions that feel natural to the human eye or dramatic, slow-building reveals that synchronize with the emotional arc of the music or scene. |
Hold Time | Hold time is the specific duration a lighting state or "cue" remains static and unchanged before the next transition begins. Once a scene has finished its initial fade-in, the hold time acts as a programmed pause, keeping the fixtures at their set intensity, color, and position for a determined number of seconds or minutes. This is a fundamental component of automated chase sequences and theatrical stacks, as it dictates the rhythmic "dwell" of the lights, ensuring the visual atmosphere stays consistent with the timing of the performance before moving on to the next cue. |
Fade Out Time | Fade-out time is the specific duration it takes for a lighting fixture or scene to transition from its current intensity down to zero or a lower level. Rather than having the lights disappear instantly, this setting allows for a controlled, gradual dimming that can range from a quick dip to a very slow, atmospheric disappearance. By adjusting this timing, designers can prevent jarring "blackouts" and instead create elegant exits or subtle shifts in focus that mirror the natural decay of a musical note or the closing of a dramatic scene. |
Beat Sync | Beat sync is a feature that synchronizes lighting transitions, movements, and effects directly with the tempo of the music, typically measured in Beats Per Minute (BPM). Instead of following a fixed internal clock, the lighting software or console listens to an audio source—via a microphone, a direct line-in, or software integration—and triggers a change every time it detects a rhythmic pulse. This ensures that strobes, color chases, and moving head sweeps stay perfectly "on beat," creating a cohesive and immersive experience where the visual energy mirrors the music's timing automatically. |
Program Numbers | For the Auto Show to work properly, Programs must have program numbers so the Auto Show algorithms can pick programs by their program number. There is a lot that goes into the selecting process but part of that process is a random pick within the intensity category on the first program. Program numbers make that happen more easily. I may eventually do away with program numbers but for now, they are what makes GigLights work well. |